Always meaning to get around to breezing through one of those effortlessly creative days fashioning works of wonder that other bloggers seem to have so often, but can never quite seem to spare the time? I have discovered the answer! Simply set aside a day to accomplish all those niggly admin tasks you've been putting off for weeks. The results will astound you - you will instantly experience a compelling urge to ferret out those neglected baubles, breathe new life into that coagulating glue, and touch neither pen nor paper, keyboard nor phone until the surface of every conceivably customisable accessory in your possession is festooned with pearls and enamel flowers (er, just me?). OK, you may not have made much of a dent in your To Do list, but you will have some beautiful new toys!
Thus began the story of how "just 10 minutes of DIY before I crack on with my spreadsheets" turned into 2 pairs of embellished sunnies - worth it? Hell yes! (Thankfully, though, I have now almost run out of supplies, so may get something productive done before my next eBay haul pops through the letterbox!)
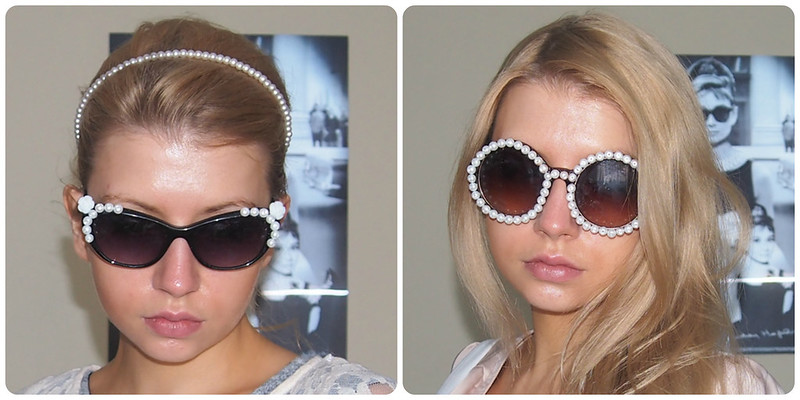
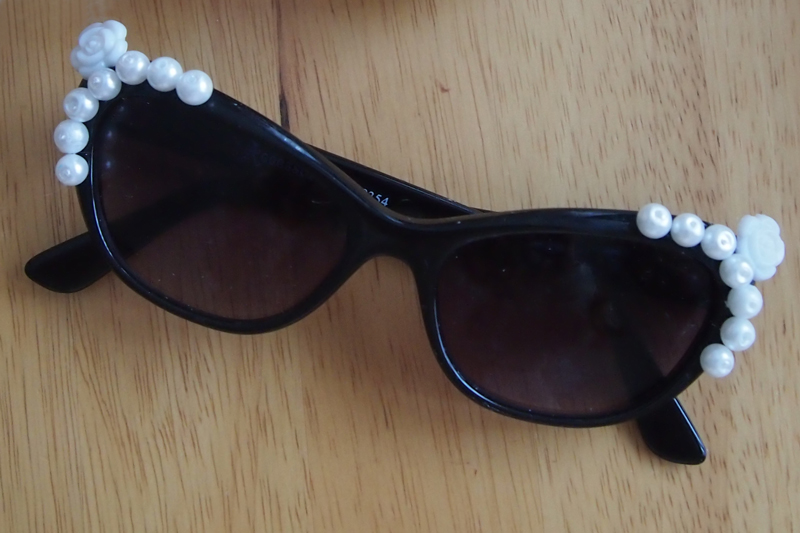
Cool Cat
A couple of summers ago, I spent weeks, if not months, searching for the perfect pair of cat-eye sunnies, before snapping these up, along with their white counterparts, for a ridiculously low price in the Accessorize sale. This year, though, I couldn't help but have my head turned by the incredible embellished versions popping up everywhere... Rather than abandon my trusty companions for pearlier pastures, I decided, why not revitalise them to my bespoke specifications, for a fraction of the cost of a new pair? I already had some pearl beads and rose-shaped enamel buttons, intended for a sewing project I'd never quite had the guts to begin (baby steps...), so what was to stop me? (Certainly not that pesky spreadsheet.)
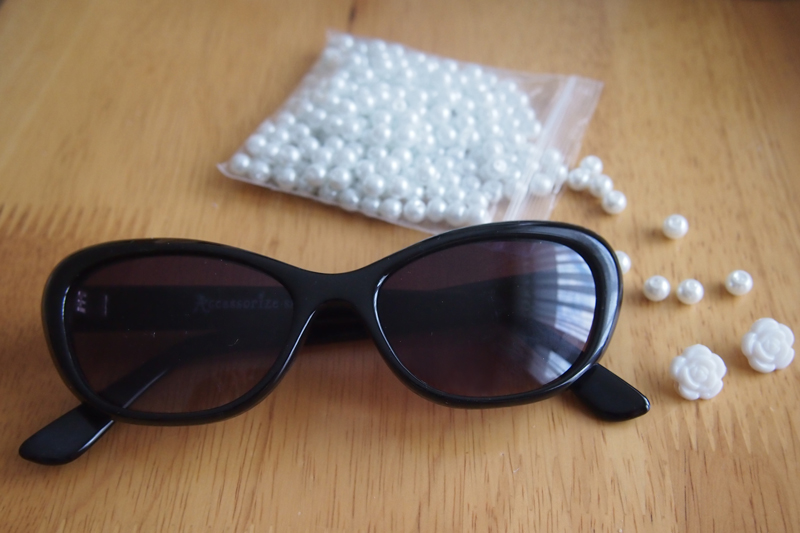
You Will Need:
- Cat Eye Sunglasses - I decided to use my black ones for an on-trend monochrome look, to make the white trimmings "pop", but you could go all-white, or even coloured if you will!
- Pearl Beads - Mine had holes, since they were designed to be sewn onto fabric, but they also had slightly flatter surfaces around the holes, which made the gluing process a lot easier than it might otherwise have been. You can buy the ones I used from eBay here, or flat-back ones here.
- Small Resin Roses - You can buy flat-backed versions from eBay, but, again, mine were designed to be sewn onto fabric, button style - however, this had the fortuitous outcome that the back fastening provided an extra surface to adhere to the sides of the frames, allowing them to be affixed more securely.
- Glue (ignorant of whatever the go-to-solvent amongst craft natives may be, I went on familiarity: Super Glue)
- If you are not intimately familiar with a glue gun: plastic gloves, something to protect your work surface, and something to practise gluing your first few beads on (- the first thing I managed to stick together? My fingers). And if I was to do it again, in a less impatient mood? I'd cut a couple of pieces of paper or cloth to fit the lenses, in an attempt to avoid the inevitable glue damage (- seriously, is it just me?!).
How To:
- Carefully glue adornments into desired positions - I concentrated on the outer corners to emphasise the cats-eye shape; position roses at the tips, with around half protruding over the edge, for an exaggerated feline flick.
- One by one, dot a small amount of glue onto the surface of each bead (a little more on the roses), then press firmly into desired position on frame until it feels secure. I've read tutorials demanding 2 minutes per bead, but I found 10 seconds sufficient for most - the surfaces of some of the beads were a little uneven, though, which caused me to abandon a few!
- Leave to dry overnight.
- Don, accompanied by monochrome ensemble, beehive and daydreams of '60s movie-stardom.

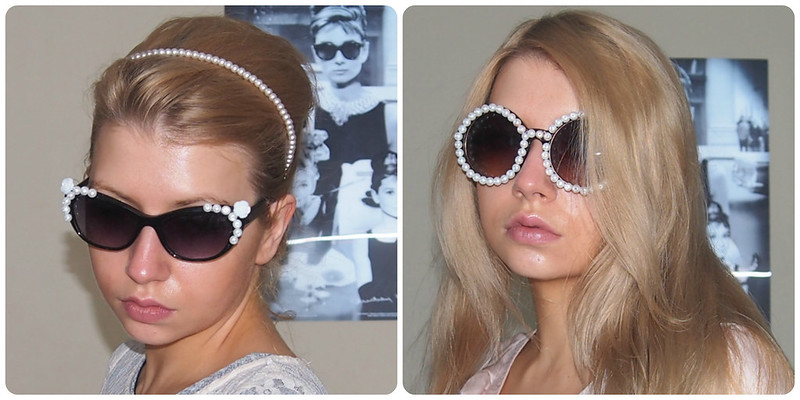
And Around We Go...
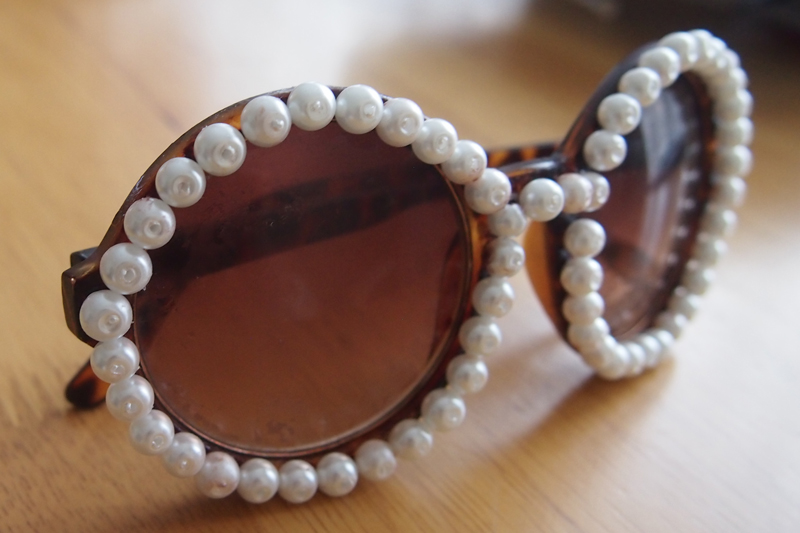
Once I'd gotten my creative groove on, the urge to create my very own pearly-all-rounders, a la those vintage Chanels resurrected by Rihanna, was impossible to ignore. At £2, I was prepared to sacrifice last year's Primark tortoiseshells to the cause...
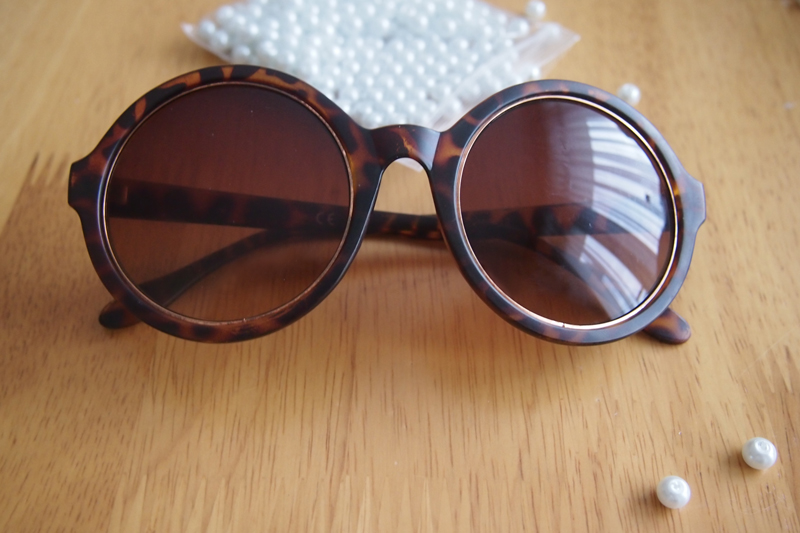
I used the same pearl beads, and the same procedure, as for the cat-eye versions, although, due to the sheer number necessary, this pair took a lot longer to complete (1 hour 45 minutes, compared to 45 minutes for the others). Although referencing '90s Chanel, I feel like the round lenses give them a '70s vibe - bring on the flares?

So, did they survive The Ultimate Test: leaving the house? I'm happy to report that the answer is yes, without the loss of a single bead (*air punch*).
Will you be trying out the embellished sunnies trend? DIY or high street buy..? I have to admit that, even if the results aren't quite perfect, I'm definitely growing to appreciate the feeling of creating something myself, over and above the money I save (and the hours of blissful admin-ignorance I gain)... it almost equals the feeling of pride I felt surveying my castle constructed from loo roll in 1989...


No comments:
Post a Comment